TextRaze
How to Reduce Harsh Shadows in Product Photos
Clean up distracting shadows without losing the shape, color, and small details that help a customer understand your product.
By TextRaze
Published Updated
Quick answer
If you can retake the product photo, softer light and a reflector are often the most reliable fix. If you only have the existing image, a local shadows or exposure adjustment can help when texture is still visible. For a hard shadow crossing a complex surface, TextRaze can generate a softened version to compare. Check labels, color, and texture: AI may redraw them, and it cannot verify detail hidden in a nearly black area.
Which shadow fix fits the photo you already have?
Start with how much detail is visible and whether you can photograph the item again. A new lighting setup, a local adjustment, and a generated edit solve different problems.
| Approach | Use it when | What to check |
|---|---|---|
| Retake the photo with softer light | You still have the item and can repeat the shot, especially when color and texture must be accurate. | Move or diffuse the light, add a reflector, and keep natural contact shading. Inspect the new frame before putting the setup away. |
| Adjust shadows or exposure locally | The shadow is dark but still contains useful detail. You want a selective brightness correction rather than a new interpretation. | Use a mask or brush in an editor you know. Watch for noise, gray-looking blacks, halos, and flat contrast. |
| Try AI shadow reduction | You cannot reshoot and a distracting shadow crosses an existing product or everyday photo. | TextRaze can produce a candidate edit, but compare the whole subject. Reject changes that misrepresent a real product. |
| Use another source or a careful manual retouch | A shadow hides a crucial detail or the result must document the product precisely. | Neither brightening nor generation proves what was hidden. Keep the original and avoid inventing factual product detail. |
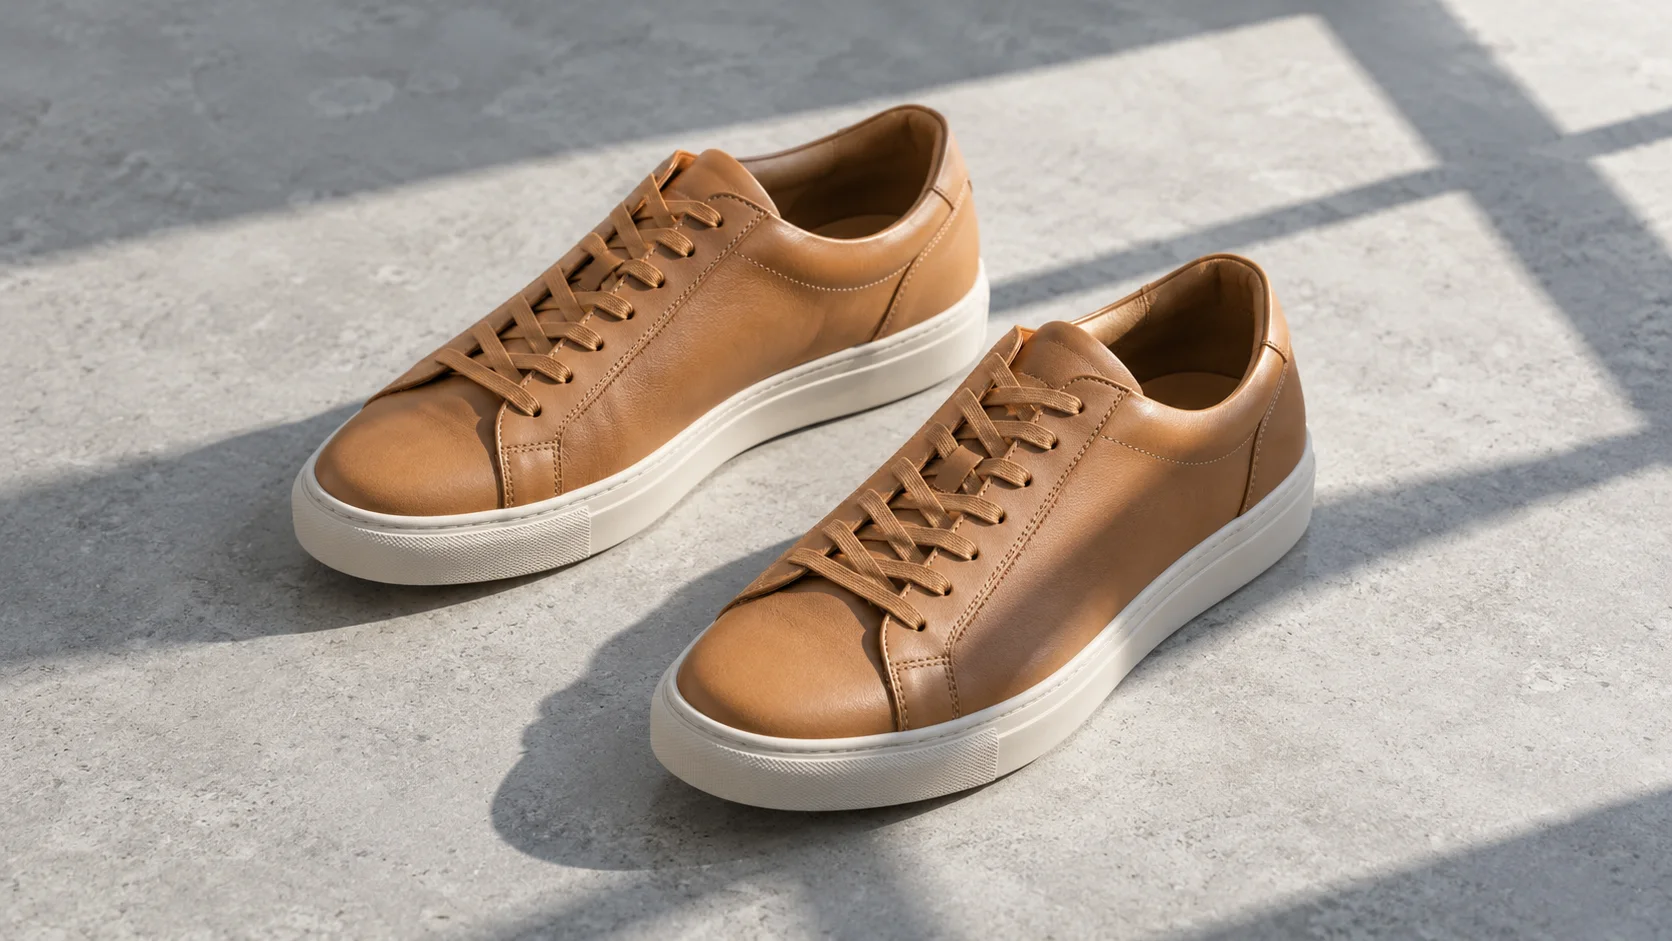
Example: hard window shadows across a pair of shoes
This sample starts with diagonal window shadows crossing tan shoes and a concrete surface. One TextRaze shadow-removal generation reduced those dark bands while leaving softer shading beneath the shoes.
Original
TextRaze result
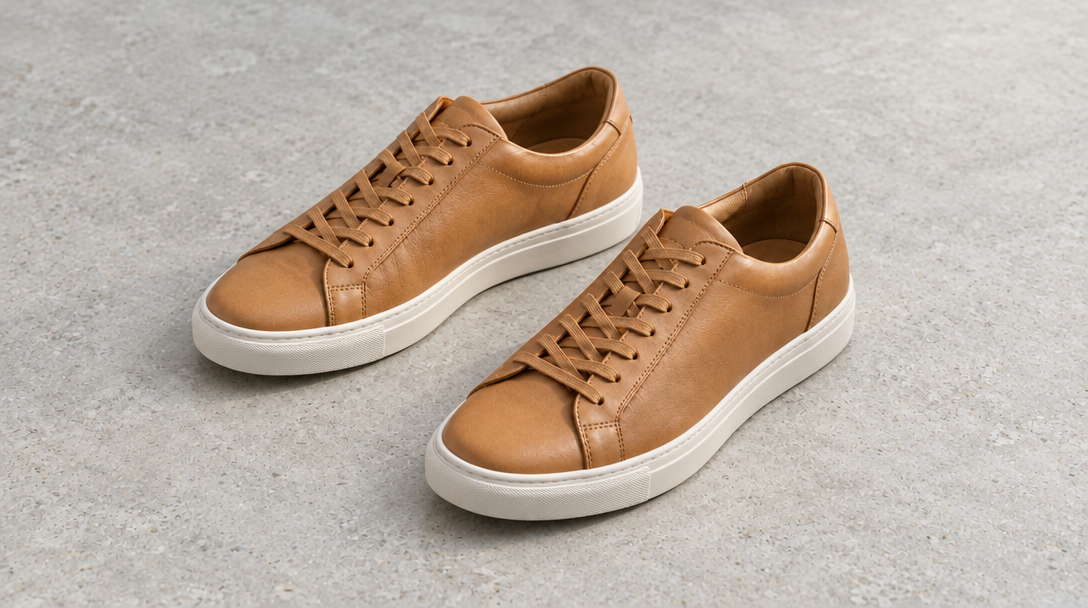
- The broad window-shadow bands are reduced; the result is not completely free of shading.
- The shoes remain recognizable, but the composition and fine surface details differ. Compare stitching, laces, soles, and color before using a similar edit for a real listing.
- The output is 1088 × 608 pixels; the source is 1672 × 941. This tool does not promise to retain the source dimensions.
An AI-generated sample scene, edited with TextRaze on October 10, 2026. The result is shown without manual retouching. This example uses a sample image rather than a customer photograph.
1. Decide which shadow is actually a problem
A dark stripe across a tabletop can distract from a product. A small shadow directly under a shoe can help it feel grounded. Treating both as defects can leave a listing image looking flat or make the object appear to float. Before editing, identify the shadow that prevents someone from seeing the item clearly.
Cast shadows fall onto another surface, such as the wall behind a bottle. Shading on the product itself describes its shape: the darker side of a curved vase tells you that it is round. A contact shadow is the small dark area where the object meets the surface. These can overlap, but separating their roles makes it easier to judge the result.
For a shop listing, a useful goal is usually a more even background with readable product details. Keep enough shading to show the material and shape. If a shadow hides a crucial feature, such as the stitching or a connector, retaking the photo may be more reliable than asking AI to reconstruct something that was never visible.
2. Start with the clearest available original
Use the original camera image rather than a screenshot of a compressed marketplace listing. Compression can merge fine texture into blocks, especially in dark areas. Enlarging the image afterward does not restore the missing detail. Keep an untouched copy so you can compare product features after editing.
Crop away unnecessary space if it makes the product very small in the frame, but leave room around the shadow you want to reduce. A crop through the edge of the object makes it harder to evaluate its outline. Do not brighten the image so aggressively that a white label or pale fabric becomes featureless before you upload it.
- The product is in focus and its full outline is visible.
- The unwanted shadow and some surrounding background are included.
- Labels, seams, ports, and other identifying details are readable where possible.
- The original file is saved separately from any edited version.
3. Process one image and compare it carefully
Open the shadow-removal tool, upload your image, and continue into the editor. Check the preview and displayed credit cost before starting. Once processing finishes, compare the original and result at the same apparent size. A larger output may look more detailed simply because it occupies more of the screen.
First look at the photograph as a whole: is attention drawn toward the product, and does the lighting still make sense? Then zoom in on the parts a customer would care about. A cleaner background is not enough if the tool has changed the number of buttons, the grain of a material, or the outline of the object.
AI shadow removal is an image edit, not a physical measurement of how your product would look under different lighting. It can redraw textures while reducing a shadow. Treat the result as a candidate to inspect, rather than an automatically accurate replacement for the original.
4. Check the details that matter to a buyer
Inspect the product before judging the background. Color, markings, and proportions can affect what a buyer expects to receive. Compare against the original on the same display; a change in screen brightness or a warm display setting can make the comparison misleading.
Pay special attention to transitions where the shadow crossed a patterned surface or touched the object. Look for pale halos around edges, repeated texture, an uneven tabletop, or a remaining dark patch that looks disconnected from the light source. At normal listing size these may be more noticeable than they were in a zoomed-in preview.
- Shape: handles, corners, holes, and proportions still match the original.
- Color: the item has not become warmer, paler, or more saturated.
- Detail: logos, printed text, stitching, and surface patterns remain accurate.
- Lighting: the product sits naturally on the surface, without an obvious halo.
- Delivery: the downloaded file opens correctly and suits your listing requirements.
When a reshoot is the better option
A nearly black shadow may contain little usable visual information. If it covers an important part of the product, a model has to infer the missing detail. The same is true of a bright reflection that erases part of a label. For an image that must accurately document an item, a new photo is often the safer choice.
Try a larger, softer light source: move close to a window with indirect light, or diffuse a lamp with equipment intended for that purpose. A white card opposite the light can lift the dark side without adding a second harsh shadow. Change the distance and angle of the light, then review the photo before shooting the rest of your inventory.
For a series of products, keep the camera position, background, and lighting consistent. Editing every photograph separately can produce a mixed-looking catalog, even when individual results look good. Start with one representative item and settle on a repeatable setup.
Common questions
Should I remove every shadow from a product photo?
Usually not. A soft shadow under the item helps show where it sits, and gentle shading communicates shape. Reduce shadows that obscure details or compete with the product. Check your marketplace’s image requirements separately.
Can AI recover the exact texture hidden in a dark shadow?
Not reliably. It may brighten information that is visible, but it can also generate plausible texture. If the original does not show the detail, an attractive result is not proof that the reconstruction is accurate.
Can I also change a price or date printed in the image?
That is a separate edit. Use the text editor for your own promotional material, and review the lettering and background afterward. Keep product labels and factual listing details accurate.
Working on a price, date, or label in your own design? Edit Text in a Photo is the dedicated tool for changing words.